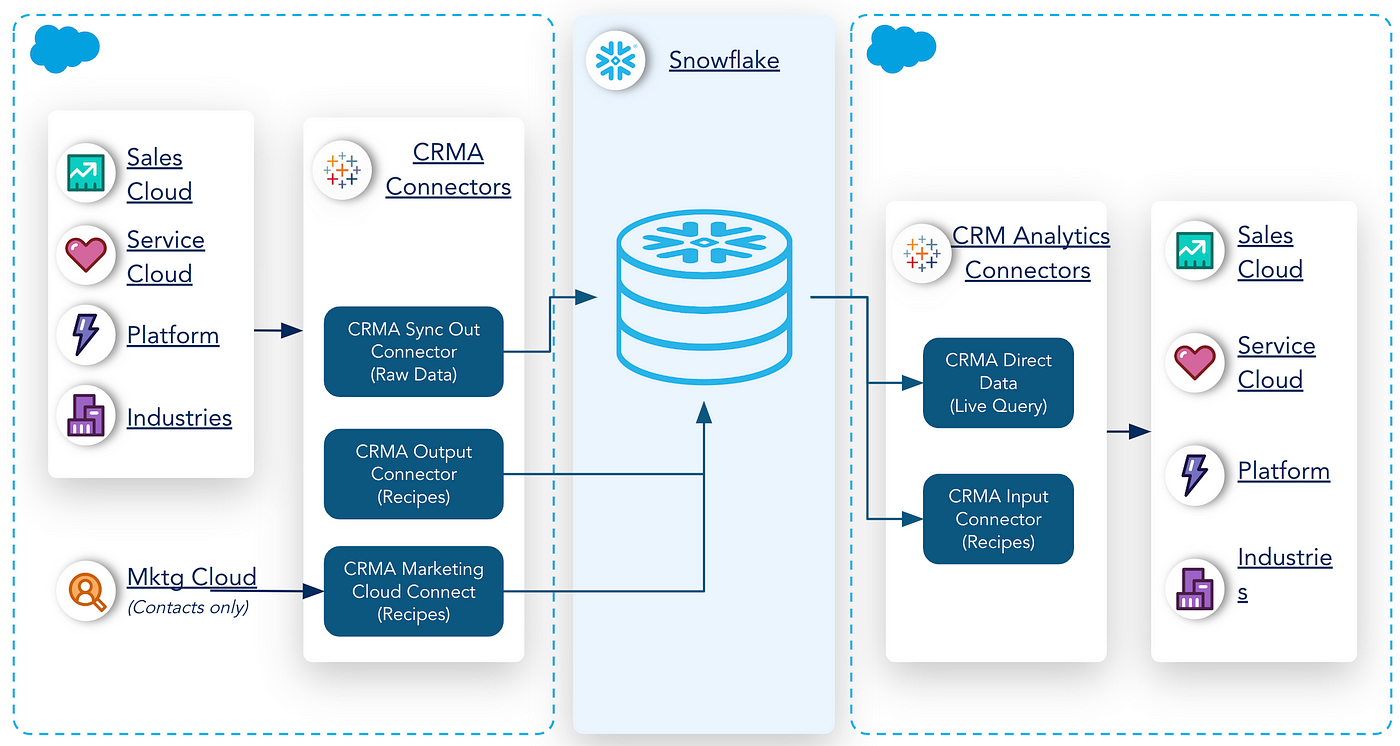
Salesforce to Snowflake and back
Part 1 of 2: Salesforce to Snowflake
Enriching Salesforce data with data from your enterprise data warehouse can be done in several ways.
In this two parted article, I am going to explain how you can sync data between Snowflake and Salesforce Sales Cloud using the Salesforce CRM Analytics platform. But the same principle can be applied when moving data to and from Salesforce Service and Marketing Cloud.
For this to work you need a working Snowflake subscription and Salesforce + at least one CRM Analytics license (Contact your Salesforce team for the details).
In Salesforce Sales Cloud I have an Account named Acme and this is the account that we will be exporting from and importing data to.

As you can see there is missing information on the Acme Account page that we will be populating shortly.
Enabling data export from Salesforce to Snowflake
Salesforce has the ability to read data from Snowflake and the Snowflake Connector for incoming data that can be found in CRM Analytics is enabled by default.
To enable the ability to export data from Salesforce to Snowflake go to Settings and in the left navigation pane under PLATFORM TOOLS go to Feature Settings/Analytics/Analytics/Settings (like below)

Select enable Snowflake output connection.

Click Save
You have now successfully enabled the Snowflake Output Connector on Salesforce CRM Analytics.
Snowflake Output Connection
We will start by moving data from Salesforce Sales Cloud to Snowflake and the first thing that we have to do is to configure the Snowflake Output Connector in Analytics Manager.
While in Sales Cloud go to the top left navigation pane (the 3x3 dots below the blue cloud) and search for Analytics Studio.

Once you are in Analytics Studio on the Left navigation pane (mid-screen) select Data Manager.

In Data Manager select Connections in the left navigation pane.

Select New Connection in the top right corner.

Search for Snowflake, select Snowflake Output Connector, and click Next.

Fill in the required information to connect to your Snowflake instance. For the sake of the demo, I will be using username and password to login to Snowflake.
Important: Developer Name is the name that will be visible when you start creating your Recipes.

Account should be in the format organisation-account
In my example the Snowflake Account name is IZ27431 and the Organization name is WEELGRT so the information that is needed in the field Account is WEELGRT-IZ27431
I’m using my database called DEMODB and the schema called SALESFORCE and a virtual warehouse with the name XSMALL

Click Save and Test and if all went well you should be getting a green confirmation banner.

Creating the Recipe
To Extract, Transform and Load Salesforce data to Snowflake we need to create a Recipe.
To create a new Recipe select Recipes in the left navigation pane (in Data Manager).

Select New Recipe in the top right corner.

Select Add input Data

We will start by defining an input that in this case will be the Account object (table) from Salesforce Sales Cloud.
In the top left corner Select the dropdown and deselect CRM Analytics Datasets and External Connected Objects.

Click Done
Find and Select Account

For the sake of this article, I will create a simple Recipe where I will Extract Id, Name, BillingCountry, Phone, Website, SLA, and Rating from Salesforce to Snowflake. Select the Columns that I mentioned above.
Click Next
In Recipes select the Account Icon and a preview of the data will appear below

Click on the plus sign to the right of the Account Icon and select Output

In Output under Write To select Output Connection.
Connection Name will be the Developer Name for the connection that you created in an earlier step. My is SnowflakeExport.
Object name is the name of the Snowflake table that you want to write to and in my case that is Account.
Map the fields from Salesforce to Snowflake. If the field names are the same they will automatically be populated.

Select Apply
Important: The Account table in Snowflake has to be pre-created in Snowflake prior to this step.
SQL code for Account table creation.
--Account table creation

CREATE OR REPLACE TABLE Account (
Id varchar(50)
,Name varchar(50)
,BillingCountry varchar(50)
,Phone varchar(50)
,Website varchar(50)
,SLA varchar(50)
,Rating varchar(50)
);
Select Save and Run in the top right corner.

Go to Data Manager Job Monitor to see the progress of the job.

Once the jobs has finished take a note of the number of rows that were exported from Salesforce successfully (1002) and go to Snowflake to confirm the result.
--Confirm that the data has been imported to Snowflake
SELECT * FROM Account;
--Confirm the number of rows exported from Salesforce (1002) matches the number of rows in Snowflake
SELECT count(*) FROM Account;
Congratulations, you have successfully exported data from Salesforce Sales Cloud to Snowflake
In the next article, I will explain how you bring data from Snowflake to Salesforce